Selectaglaze utilises an odd leg frame design in its secondary glazing. This means that the frame on the room side is bigger than it is on the cavity side; which affords greater flexibility when dealing with reveals that are neither square nor true.
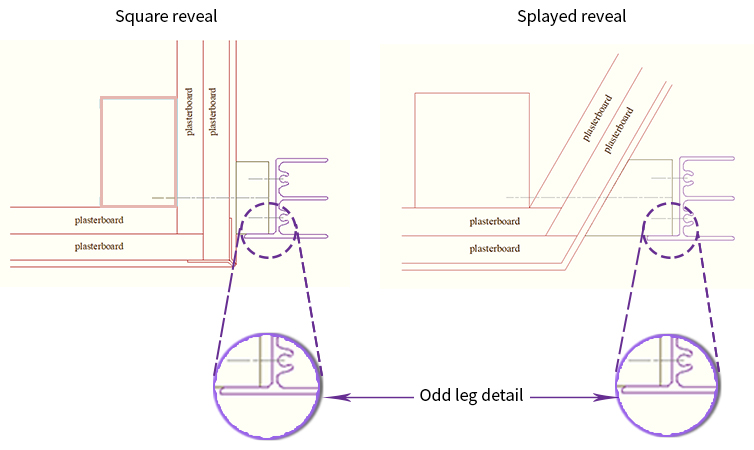 Standard fixing details showing the odd leg detail and the timber grounds all set back from the wall face
The odd leg design does not go unnoticed where specifiers are concerned. Regularly it is seen as an opportunity to fit the units right on the corner of the reveal and maybe even used to cover up a construction joint, a detail referred to as 'Lip'. On paper all seems well and good but the 'Lip' detail has some hidden dangers which need to be understood.
First and foremost where are the fixings going? The position of the fixings on the light weight systems is only 8mm back from the flange face and on the heaver casement system they are only 16mm back. This means that fixings are positioned down the end of the plaster board and through the corner bead if the openings are dry lined, far from satisfactory. Or along the joint line of the render and block work risking blowing the wall face and weakening the fixing if the opening is traditional.
Standard fixing details showing the odd leg detail and the timber grounds all set back from the wall face
The odd leg design does not go unnoticed where specifiers are concerned. Regularly it is seen as an opportunity to fit the units right on the corner of the reveal and maybe even used to cover up a construction joint, a detail referred to as 'Lip'. On paper all seems well and good but the 'Lip' detail has some hidden dangers which need to be understood.
First and foremost where are the fixings going? The position of the fixings on the light weight systems is only 8mm back from the flange face and on the heaver casement system they are only 16mm back. This means that fixings are positioned down the end of the plaster board and through the corner bead if the openings are dry lined, far from satisfactory. Or along the joint line of the render and block work risking blowing the wall face and weakening the fixing if the opening is traditional.
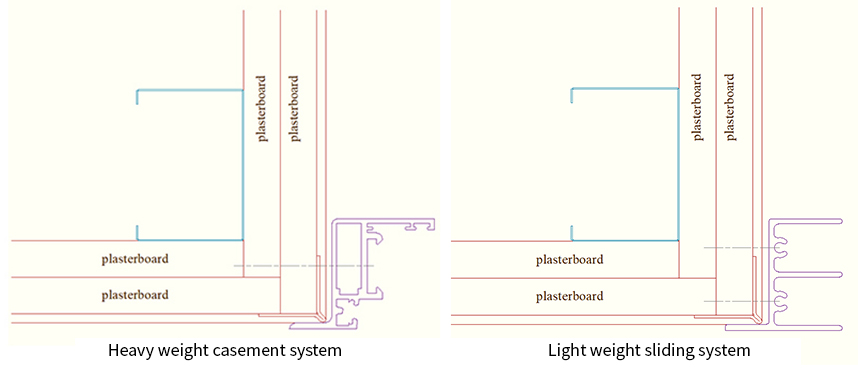 Lip fixing details showing fixing positions
Additionally few openings are square, plumb and true around the full perimeter, the lip detail provides little in opportunity to correct this. Moreover if the wall face is not fully flat, i.e. it is convex or concave then this will show itself in gaps behind the flange, affecting the seal, highlighting the deviation and detracting from the elegance of the treatment.
Lip fixing details showing fixing positions
Additionally few openings are square, plumb and true around the full perimeter, the lip detail provides little in opportunity to correct this. Moreover if the wall face is not fully flat, i.e. it is convex or concave then this will show itself in gaps behind the flange, affecting the seal, highlighting the deviation and detracting from the elegance of the treatment.
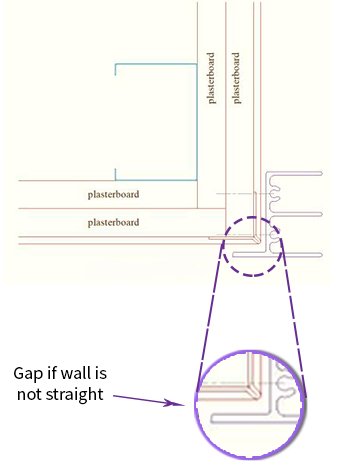 Lip fixing detail showing a gap behind the flange caused by deviations in the wall face
But these problems are not insurmountable, with a little thought and planning details can be created to provide the flush appearance required whilst maintaining a secure fixing, below are some examples. Of course there are many considerations to take on board and we would be happy to discuss your requirements and assist in working up details to your specific needs.
Lip fixing detail showing a gap behind the flange caused by deviations in the wall face
But these problems are not insurmountable, with a little thought and planning details can be created to provide the flush appearance required whilst maintaining a secure fixing, below are some examples. Of course there are many considerations to take on board and we would be happy to discuss your requirements and assist in working up details to your specific needs.
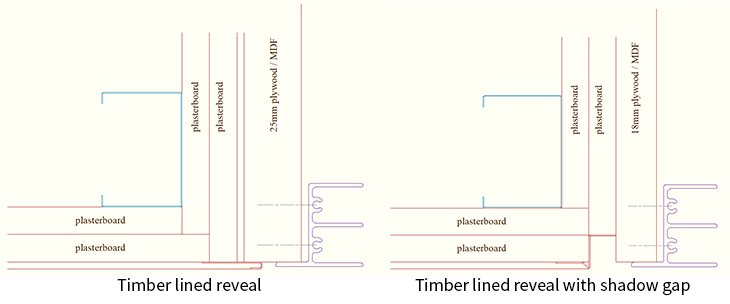 Suggested details to provide the flush look
Alternatively, embrace the setback. In our experience setting the unit back 15mm or so from the wall face always looks clean and sharp and is more practical when it comes to overcoming buildings and constructions little inconsistencies.
Suggested details to provide the flush look
Alternatively, embrace the setback. In our experience setting the unit back 15mm or so from the wall face always looks clean and sharp and is more practical when it comes to overcoming buildings and constructions little inconsistencies.
Standard fixing details showing the odd leg detail and the timber grounds all set back from the wall face
The odd leg design does not go unnoticed where specifiers are concerned. Regularly it is seen as an opportunity to fit the units right on the corner of the reveal and maybe even used to cover up a construction joint, a detail referred to as 'Lip'. On paper all seems well and good but the 'Lip' detail has some hidden dangers which need to be understood.
First and foremost where are the fixings going? The position of the fixings on the light weight systems is only 8mm back from the flange face and on the heaver casement system they are only 16mm back. This means that fixings are positioned down the end of the plaster board and through the corner bead if the openings are dry lined, far from satisfactory. Or along the joint line of the render and block work risking blowing the wall face and weakening the fixing if the opening is traditional.
Lip fixing details showing fixing positions
Additionally few openings are square, plumb and true around the full perimeter, the lip detail provides little in opportunity to correct this. Moreover if the wall face is not fully flat, i.e. it is convex or concave then this will show itself in gaps behind the flange, affecting the seal, highlighting the deviation and detracting from the elegance of the treatment.
Lip fixing detail showing a gap behind the flange caused by deviations in the wall face
But these problems are not insurmountable, with a little thought and planning details can be created to provide the flush appearance required whilst maintaining a secure fixing, below are some examples. Of course there are many considerations to take on board and we would be happy to discuss your requirements and assist in working up details to your specific needs.
Suggested details to provide the flush look
Alternatively, embrace the setback. In our experience setting the unit back 15mm or so from the wall face always looks clean and sharp and is more practical when it comes to overcoming buildings and constructions little inconsistencies.
- Date
- Category
- Secondary Glazing in Practice
- Tags
- fixing methods