With offices and hotels often situated in busy towns and city centres, noise can be a big issue. It can have detrimental effects on concentration and wellbeing, as well as unhappy guests if sleepless nights are had. Secondary glazing provides an effective solution to supplement existing windows, old and new, to create much needed noise reductions in these situations. As an independent window system, the secondary glazing needs to be installed with at least a 100mm glass to glass cavity to create the desired benefit. This needs to be kept in mind, especially if blinds and curtains have to be rehung, as they may need repositioning as a result.
Occasionally, in these types of buildings, we are asked about the introduction of acoustic vents to help meet Building Regulations Part F regarding ventilation and air changes in the rooms/spaces. This is especially so if the primary has a vent and the secondary is to be kept locked shut disallowing self-ventilation by the occupants. Yes, it is possible to introduce a vent via an enlarged timber at the head of the frame, however it comes at a cost and can compromise the benefits:
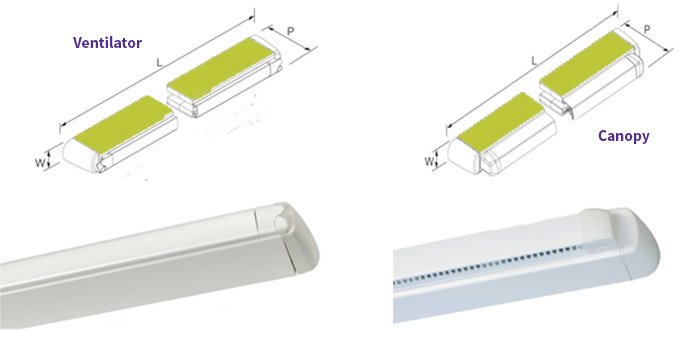 Make up of an acoustic ventilator. Areas in green highlight the acoustic attenuator
 The V75 mounted on a timber batten
Generally, the canopy is the same width on both sides of the opening. In this case of this vent, the 75mm would fit within the cavity, however the concern was room side, where it would also protrude 100mm – not great for aesthetics and would compromise space for soft furnishings.
After many discussions with the Technical Advisor, it was decided that the solution would be to use a slot vent room side. By doing this, the building control standards would still be met, the acoustic benefit would be achieved and there would be room for blinds or curtains to be hung post-secondary glazing installation.
The V75 mounted on a timber batten
Generally, the canopy is the same width on both sides of the opening. In this case of this vent, the 75mm would fit within the cavity, however the concern was room side, where it would also protrude 100mm – not great for aesthetics and would compromise space for soft furnishings.
After many discussions with the Technical Advisor, it was decided that the solution would be to use a slot vent room side. By doing this, the building control standards would still be met, the acoustic benefit would be achieved and there would be room for blinds or curtains to be hung post-secondary glazing installation.
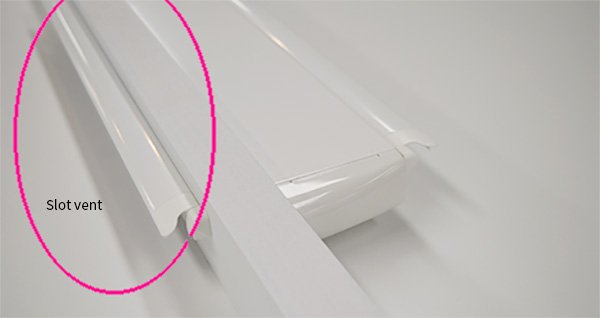 Acoustic ventilator with slot vent on other side
In general, we try and avoid the use of vents where possible and only if a necessary adaptation. Not only does it somewhat negate the benefits the secondary provides in terms of acoustic insulation, but can undermine aesthetics and decorative furnishings. In this case, it was a necessity to meet building control regulations, so by working together; architect and Selectaglaze at the early design stage, a solution was met.
Acoustic ventilator with slot vent on other side
In general, we try and avoid the use of vents where possible and only if a necessary adaptation. Not only does it somewhat negate the benefits the secondary provides in terms of acoustic insulation, but can undermine aesthetics and decorative furnishings. In this case, it was a necessity to meet building control regulations, so by working together; architect and Selectaglaze at the early design stage, a solution was met.
- By introducing a vent, a hole needs to be made in the secondary glazing timber sub-frame, which creates a passage for sound to travel
- It breaches the seal that secondary glazing creates which can in some cases lead to condensation
- Different vents provide different levels of sound attenuation, the greater the dB reduction required, the larger the canopy and vent needed
- Is there space in the cavity to house the vent? – often in the case of Listed and heritage buildings, it is difficult to create a gap big enough
How do acoustic ventilators work?
They are formed in two parts which sit either side of the secondary glazing. The ventilator sits room side and the canopy sits in the cavity; both have acoustic attenuators to reduce the resonance coming from the vent in the primary glazing and to provide air flow into the room.
Make up of an acoustic ventilator. Areas in green highlight the acoustic attenuator
Configurations and results
The acoustic attenuators come in three sizes; 25mm, 50mm and 75mm, which provide different dB reductions. The ‘p’ (projection) dimension of each can vary depending on if it is open or closed. Generally, to gain maximum performance, the size of the acoustic attenuator should be mirrored on the vent and canopy; and the largest that the space will permit. However, it is possible to mix and match by using a larger acoustic canopy within the cavity and a smaller vent room side. This will have an effect on its efficacy – the optimum option should be used.A recent project – meeting Building Regulations Part F
We were recently approached about the conversion of a building to a hotel, which was in early design stage. In this particular project, the designers were working on a solution to meet Building Regulations Part F. Secondary glazing was required to help meet acoustic requirements. Full access to the primary windows was required for cleaning and ongoing maintenance, however, they needed to be locked, so that guests could not open them and allow the noise from the city beyond to flood the room. The designer was querying the use of a vent and if this would be a viable option. A sufficient cavity could be created between the primary and secondary glazing to create not only the dB reduction, but to house the external facing canopy of the ventilator. It would mean that the units would have to be installed close to the face of the reveal. There was also sufficient height within the window opening to create an enlarged timber head into which the vent would be placed. However, by doing this a passage of sound would be created, so the designers decided to use the V75 acoustic vent, to negate this detrimental effect.
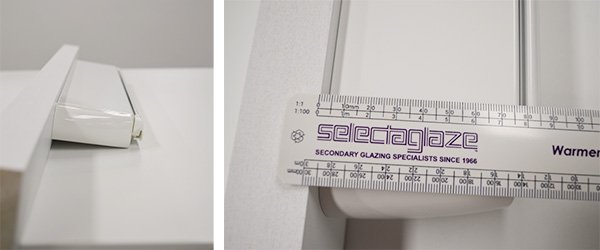
The V75 mounted on a timber batten
Generally, the canopy is the same width on both sides of the opening. In this case of this vent, the 75mm would fit within the cavity, however the concern was room side, where it would also protrude 100mm – not great for aesthetics and would compromise space for soft furnishings.
After many discussions with the Technical Advisor, it was decided that the solution would be to use a slot vent room side. By doing this, the building control standards would still be met, the acoustic benefit would be achieved and there would be room for blinds or curtains to be hung post-secondary glazing installation.
Acoustic ventilator with slot vent on other side
In general, we try and avoid the use of vents where possible and only if a necessary adaptation. Not only does it somewhat negate the benefits the secondary provides in terms of acoustic insulation, but can undermine aesthetics and decorative furnishings. In this case, it was a necessity to meet building control regulations, so by working together; architect and Selectaglaze at the early design stage, a solution was met.